Showing posts with label Before and After. Show all posts

Tuesday, May 20, 2014

Porch Lights Restored

No comments:
 I purchased a set of vintage Phil Hinkley & Co. light fixtures from Midland Theory on Etsy for our back porch, in June, of last year. I had been searching for just the right fixtures, looking for period accuracy and something that mimicked what we already have on the house AND was a set. These were just the ticket. However, one of the lights was damaged during shipping and I had to contact the seller. We corresponded a bit and I promised to send her pictures of the lights when they were restored and hung. That's when I realized that it took me a YEAR to finish this project! Have I mentioned how slow we are?

First we had to repair the broken light (gratefully the glass was intact) I stripped the lights down to the original brass using steel wool, dismantled them, cleaned them, primed them, put two coats of black paint, rewired them with new sockets and bought new screw covers for the tops that were missing. Steven used his mad wiring skills and ran the electricity and hung them outside.

I love old light fixtures. Have I mentioned that before? Now searching for a vintage light for the back door.

Wednesday, October 13, 2010

Vinegar and Salt to Clean Old Faucet Bodies

No comments:


After researching ways to remove lime and mineral deposit build up from these old faucet bodies, we settled on a concoction. Five table spoons vinegar to two teaspoons salt. WORKED LIKE A CHARM. After testing a few small pieces, we made a large batch of the mixture and let the faucet bodies soak. That was the key. That and then scrubbing them gently with a wire brush. The tedious part was picking at the grooves with a set of "dentist" looking tools Steven bought for the project. After paying to have the visible parts of these faucets rechromed, we just couldn't bring ourselves to screw the new, freshly chromed pieces, to these green scummy faucet bodies. What a pleasant surprise it was when, after a little elbow grease, they came out so clean and shiny. Steven has put one faucet body back together on the fresh, refurbished porcelain sink. Will take pictures of the final product once the sinks are hanging in the bathroom. Little by little...

Sunday, July 25, 2010

Refurbished Shelf Back Faucets

No comments:


We are getting closer and closer everyday! Last time I mentioned plumbing was when we had the sinks and tub refinished. At that time we were still in limbo about what to do for faucets, and finally settled on the idea of refurbishing the old shelf back faucets. There were small details about the old faucets that we didn't want to sacrifice buy purchasing new ones.

Steven removed the old sets and dismantled each one carefully. We sent pictures of the faucets out for bids and finally settled on a company in Houston called Atlas Plating. They re-chromed one piece to make sure the metal would re-chrome well, sent us a picture to approve and then began the work on all the pieces. It took three weeks and we finally received the final product on Friday. They did a beautiful job. Next step: replacing the rubber washers and seats. Then the installation!

Reworking and restoring something old into something fresh and new makes me giddy!
Sources for shelf back plumbing options:

Saturday, May 1, 2010

Chandelier Restoration Complete!

1 comment:


I found two brass Chandeliers at the Catholic Church Bazaar probably four years ago. I paid five dollars for each one at the time. They've been a project I work on in stages. Feels amazing to have them finished and hung! One of many things on a "before the baby arrives" checklist.

First step: dismantle and clean. Second: rewire and/or check old wiring. Third: paint with primer. Four: Find replacement parts. Thus the reason this little project was so drawn out.

The most challenging part about reworking these little beauties was finding replacement parts. Fibre drip candle covers (that had to be painted white), bell canopies (in paintable spun brass), bobeches (huh? yeah, that's what I said) in white porcelain. Crossbars, blind pendant stems and chain. Whew!
It was challenging, but fun. My dream job: to be paid for restoring antique lights. Didn't know that about me did ya? (GRIN).

Resources for Antique Lamp Restoration:
Antique Lamp Supply
Highland Lighting

Monday, April 19, 2010

Block Head {The Last of the Trim}

No comments:


I'm trying to keep things in chronological order with the house AND alternate between house posts and posts about life and my projects so you don't become bored with the blog (grin).

As I'm typing this message Steven is hanging door trim, but there was a lot of work involved in preparing to hang said door trim. These blocks were the last of the wood restoration. These little blocks are the base of the door trim in the house. Above is what I was doing on April 7. Bleaching and spackling and painting. Below are the finished, blocks and door trim headers.

A special thank you to Benny, Steven's dad for taking time out of his busy schedule to help hang the doors. Not a fun or easy project for two perfectionists!

Monday, April 12, 2010

Chrome Feet Make Me Smile

No comments:

Oh how I wish I'd taken before pictures of the tub feet. They were humorous. Spray painted shiny silver (barf) so for me to see these in true chrome just makes me sigh with joy. They are sooooo lovely. A splurge, but totally worth it. The above pic shows the floor color we've chosen for the master bath, the color of the outside of the tub, the new chrome feet and the cultured marble we've chosen for the shower. More sighs...

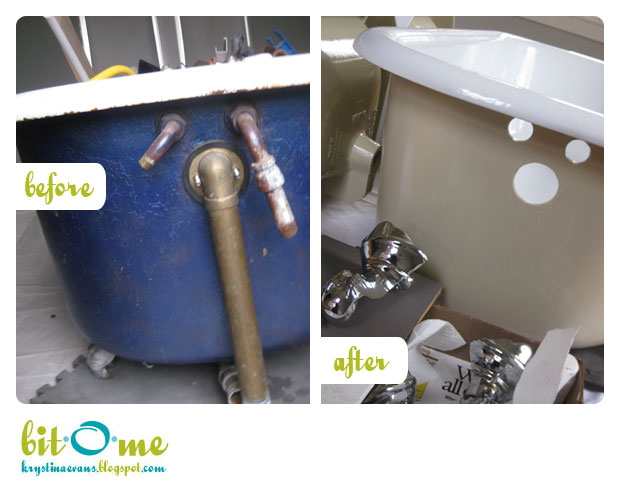
For now the tub and sinks sit in the master bath. Waiting to be installed. Waiting for their new or refurbished faucets. Below are a few before and after shots for your viewing pleasure! I love before and after moments...but I'm sure you know that by now.

Wednesday, August 19, 2009

The Transformation of a Handle

1 comment:


During the demolition stage of our remodeling I scurried around behind Steven, saving various items I thought we might need/reuse/rework/save/frame. The historian in me wanted to make sure we salvaged items that would bring the “old” back into our home. He would rip, bang, pull and drop and I’d sift, sweep, wrap and bag. These handles are just a few of the items I have stashed away.
This week I’ve been cleaning and reworking them so that we can use them on the drawers for the closet in our master bedroom. We removed them from cabinets in the small kitchenette that was once the maid’s quarters. No employed maid in this house; just little ‘ole me. So, out went the kitchenette. The transformation of these handles was made possible by the use of ammonia, fine steel wool and glove clad hands.
I LOVE finding new uses for old items. I LOVE seeing these paint covered dirty handles transform into shiny, chic handles. And I LOVE my new closet.

Monday, May 25, 2009

Something New From Something Old: The Curtain Purse

2 comments:

And here she is! Isn't this lovely? I'm amazed at how pretty she is. SUPER happy with this one. Can you believe that funny old curtain could turn into something so trendy and delicate?! Below are before and after shots. I'm really getting into this "Something New From Something Old" theme.


Remember that funny fringe on the bottom of the curtain? Well, now it's the strap. Don't want to deal with the strap? Tuck it inside creating a simple clutch. This Buttercup bag design is a free pattern design courtesy of Made By Rae blog spot. I really love her blog and the clever patterns she creates. Thank you Rae!


The outside was so simple, I thought it would be fun to throw a splash of color inside.


Oh, I'm so happy with the end result. Can't wait to find the next "something old." Stay tuned!

Friday, April 3, 2009

Something New From Something Old

10 comments:
Last Friday, I visited a couple of my favorite resale locations here in Livingston. I find that it inspires creativity to peruse items that other people have discarded. At times I find wonderful treasures for only a dollar! During my last visit I was on the hunt for fabric.

I came away with two items; a single panel from a set of curtains from the 70’s and a home-made “old lady” jacket (age, undetermined). When I stumbled onto the curtain panel I immediately envisioned a bag. When I saw the old lady jacket I estimated there was enough fabric to transform it into a dress for Marin. Below are before and after pictures of the jacket, turned dress.

I’m thinking it’s cute enough that it might be Marin’s Easter dress. What do you think? Is it too short? Lay some comments on me.

Happy Friday!

LinkWithin

Related Posts Plugin for WordPress, Blogger...